Saturday, November 29, 2008

Implicit vs Explicit Cursors. Static vs Dynamic Cursors.


Life Cycle of DB Cursors. Implicit vs Explicit, Static vs Dynamic Cursors.

What are Database Cursors?


Oracle RDBMS assigns a private area to contain related information and the data returned or affected by a SQL statement when executed from a PL/SQL block. A Cursor is a mechanism of naming that private area so that the contents of which can be manipulated programmatically.


A Cursor in its simplest form can be thought of as a pointer to the records in database table or a virtual table represented by the result of a SELECT statement (in case of JOIN for example). A sample Cursor declaration/definition:


DECLARE

CURSOR sample_cur /*... explicit cursor ...*/
IS
SELECT T2.description
FROM SampleTable1 T1, SampleTable2 T2
WHERE T1.id = T2.id

/*...declaring a variable to hold data...*/
sample_var VARCHAR2(50);

BEGIN

/*... open the cursor if not opened already ...*/
IF NOT sample_cur%ISOPEN
THEN
OPEN sample_cur;
END IF;

/*... fetching data from a cursor into a variable ...*/
FETCH sample_cur INTO sample_var;

/*... once finished using the cursor then close it ...*/
CLOSE sample_cur;

END;


Once defined/declared a Cursor can be OPENed, FETCHed, and finally CLOSEd quite easily using the obvious looking commands. You can put the FETCH inside a loop if you wish to iterate through all the rows returned by the cursor. This of course holds true only for Explicit Cursors as these operations are (and can only be) performed implicitly by the PL/SQL engine for Implicit Cursors. Read more about the type of Cursors in the subsequent sections.

Life Cycle of a Cursor. How PL/SQL Engine executes a Cursor?


The PL/SQL Engine performs the following operations (either automatically or as specified in the program depending upon whether the cursor is implicit or explicit) during the entire life cycle of a database cursor:

  • PARSE: making sure that the statement is valid and determining the execution plan. Implicitly done by the engine.
  • BIND: associating values with placeholders in the SQL statement which is implicitly done by the engine for static SQL and needs to be specified explicitly for dynamic SQL.
  • OPEN: acquiring memory for the cursor, initializing the cursor pointer and making the SQL statement ready to be executed. Implicitly done by the engine in case of an Implicit Cursor otherwise it's required to be specified for Explicit Cursors.
  • EXECUTE: executing the SQL statement in the engine and seting the pointer to point just above the first row. Can't be specified explicitly.
  • FETCH: retrieving the next row from the cursor's ResultSet. In case of an Explicit Cursor, this operation doesn't raise an exception/error when it reaches the end of the ResultSet. So you need to explicitly have some code making sure that the end of the ResultSet has reached.
  • CLOSE: closing the cursor and releasing all memory used by it. Once close you can of course not use the cursor anymore. Implicit Cursors are automaticaly closed by the engine, but Explicit Cursors require the programmer to close them explicitly.

Implicit vs Explicit Cursors


For every INSERT, UPDATE, and DELETE in your code the PL/SQL engine creates implicit cursors and the developer doesn't require to create these cursors explicitly. In fact they can't create them explicitly even if they want to. Such cursors are called Implicit Cursors. If you have a SELECT statement returning only a single row then also an implicit cursors is created automatically. Implicit cursors are OPENed, FETCHed, and CLOSEd automatically and they don't offer any programmatic control.


For SELECT statements returning more than one rows you need to create cursors explicitly to iterate through all the returned rows/records. Such cursors are called Explicit Cursors. You can however create explicit cursors on those SELECT statement as well which return only a single row. It's advisable to do so if you're using PL/SQL Release 2.2 or earlier (read the reason below). But, if you're heavily re-using the same SELECT query then you would probably be better off with the implicit one for single-row SELECT statements.


Drawbacks of Implicit Cursors

  • Less Control: Implicit Cursors can't be OPENed, FETCHed, or CLOSEd explicitly and hence they give less programming control.
  • Less Efficient: In addition, they are comparatively less efficient than the explicit cursors (at least theoretically). The reason why it is slightly slow is because an implicit cursor runs as a SQL statement and Oracle SQL is ANSI-standard which requires a single-row query to not only fetch the first row, but also to perform a second fetch to ensure if more than one rwo will be returned by that query or not (in which case TOO_MANY_ROWS excepion will be raised by the PL/SQL engine). In case of an explicit cursor there would be only one FETCH in such a situation. But, this holds true only till PL/SQL Release 2.2 as in PL/SQL Release 2.3 implicit cursors got optimized and now they run slightly faster than the corresponding explcit cursor. In addition there are more chances that an implicit cursor would be re-used in the application and if that happens then the parsing time can be escaped as it might lie in pre-parsed state in the shared memory. So implicit cursors may enhace the overall performance of the application in case you're using PL/SQL 2.3 or later releases.
  • Vulnerable to Data Errors: Less programmatic control on implicit cursors makes them more vulnerable to data errors as you can't really OPEN/FETCH/CLOSE them at will. For explicit cursors you may have custom validations in place and decide accordingly. Example: suppose you have a query returning only a single row and you are using an implicit cursor for that, but what if the same query returns morethan one rows in future. Implicit cursor will raise TOO_MANY_ROWS exception which may or may not like depending upon your application requirements.
Difference between Static Cursors and Dynamic Cursors
  • A Static Cursor doesn't reflect data changes made to the DB once the ResultSet has been created whereas a Dynamic Cursor reflects the changes as and when they happen.
  • A Static Cursor is much more performant than a Dynamic Cursor as it doesn't require further interaction with the DB server.
  • A static cursor supports both Relative and Absolute Positioning whereas a Dynamic Cursor supports only Relative Positioning.
  • A Static Cursor can be used for Bookmarking purposes as the data returned is static whereas a Dynamic Cursor can't be used for the same.
Static Cursor: A Database Cursor is called a Static Cursor if it captures the snapshot of data only at the time when the ResultSet (or Recordset in case of MS SQL Server) is created with no further DB interaction afterwards. And hence a Static Cursor will be unaware of any data changes made into the database after the ResultSet has been created. A Static Cursor facilitates scrolling through the static ResultSet and it supports both absolute and relative positioning. Reason being, the ResultSet is static and hence the cursor can always be sure of the position of all the records/rows. Relative positioning can be specified in terms of offsets from the current, top or bottom rows.

Dynamic Cursor: A Dynamic Cursor is the one which reflects all the data changes made into the database as and when they happen. This may require continuous re-ordering of data in the ResultSet due to the database changes and hence it's much more expensive than a Static Cursor. The possible re-ordering of records in the ResultSet doesn't allow a Dynamic Cursor to support absolute positioning as it can't be sure of the absolute position of a record/row in the ResultSet. Hence a Dynamic Cursor only supports relative positioning. Furthermore a Dynamic Cursor doesn't support Bookmarks for the obvious reasons.


Liked the article? You may like to Subscribe to this blog for regular updates. You may also like to follow the blog to manage the bookmark easily and to tell the world that you enjoy GeekExplains. You can find the 'Followers' widget in the rightmost sidebar.

Share/Save/Bookmark


Sunday, November 23, 2008

AspectJ, Aspect-Oriented Programming, Spring AOP


Aspect, AOP, AspectJ, Spring AOP, AspectJ vs Spring AOP

What's an Aspect? What's Aspect-Oriented Programming (AOP)?


An Aspect can be understood as a crosscutting concern which can not be covered by the usual grouping and abstraction mechanisms supported by the various programming methodologies. Why is that so? Because many concerns can cut across multiple abstractions as defined by the underlying program and hence the name 'crosscutting concern'. Right? To understand it better we can think of a simple example: In any typical Web Application (dealing with DB source) there are numerous occasions where we need to write code for opening a connection (or fetching a connection from a pool if we use Connection Pooling), defining a transaction to fire all the DML statements (contained in the transaction) in entirety and commit the changes or to simply rollback any changes made to the source in case even a single statement of the transaction fails. Now this transaction processing stuff can be thought of as an aspect and any developer using a typical programming language needs to code all the underlying stuff manually. Now, using AOP, this widely used crosscutting concern (as a typical programming abstraction can not be used for doing this directly) can be handled declaratively. This is just a sample example and the idea is to make you feel how easy (and hence fast-paced and robust) application programming can be by using this approach.


Logging is another stereo-type example of crosscutting concern widely used in almost every application. Why the developer should be bothered about coding/maintaining this using all the Logging classes/interfaces when s/he can do away with this by using an AOP in a declarative manner. As is the case with any other declarative code, this will also be translated back to the actual programming code and compiled thereafter, but who cares if all this is done behind the scenes. And not to forget that Translators/Compilers don't make mistakes while humans may (or should I say 'will' :-)) and hence using a declarative approach not only make the life simpler, but also improves the robustness of the entire application. Security is another very popular example of crosscutting concern which can effectively be handled using an AOP implementation.


Another great benefit of using AOP for such crosscutting concern implementation in an application is apparently visible if we need to change the underlying approach/considerations (say for example security considerations) then it might require a hell lot of effort to identify all the scattered code fragments doing the task and changing them to perform the new considerations/standards won't be easier either. Using AOP to handle such stuff will only require some declarative changes say for example it can be as simple as adding an advice and appropriate pointchecks.This will automatically check all such instances when any of the pointchecks match and in that case the advice will guarantee the execution of either the added security considerations or the changes ones. Wow, so easy? Yes, it is.


AspectJ - what's this?


It's an aspect-oriented extension to the Java programming language. The syntax is quite similar to that of Java and all the valid Java programs are valid AspectJ programs. But not the vice-versa as AspectJ supports many programming constructs alien to Java which are used to define and use aspects in applications. Eclipse Foundation first released this extension in 2001 and now it is available both as a stand-alone extension (pluggable to many popular frameworks) and integrated into Eclipse. AspectJ was originally developed by Gregor Kiczales and his team at Xerox PARC.
See below what Eclipse Foundation says about AspectJ:

What Eclipse Foundation says about AspectJ?
AspectJ is possibly the most generic and widely-used AOP extension and it focuses primarily on simplicity and usability. A Java-like syntax makes and availability of plug-ins for many popular frameworks make it even more popular with Java developers worldwide.


Some of the aspects which probably can not be defined by a typical programming language directly (not at least declaratively) and which can be easily achieved by using AspectJ are:

  • Ability to add members (methods of fields) within existing classes
  • Ability to define pointcuts when some method is called, some object is instantiated, etc.
  • Ability to run a piece of code before/after a pointcut is matched

Spring AOP. How is Spring AOP different from AspectJ?


Spring AOP is just another AOP implementation which comes with the Spring Framework bundle developed by SpringSource and released under Apache Licence 2.0.


Spring AOP differs from AspectJ probably in complexity and consequently in capabilities. Spring AOP implementation is less complex than the AspectJ implementation and hence less capable as compared to AspectJ. The main reason to keep Spring AOP simpler is because one of the foundation principles on which the Spring Framework was designed and developed is 'Simplicity'. In addition, Spring belives that most of the users don't really need those really complex features of AspectJ in their applications and hence Spring AOP would probably be more than sufficient for most of the application developers. In case there are a select few who want to use those missing features then they are most welcome to use AspectJ from within Spring Framework has support fro AspectJ since Spring 1.2 version itself and in every subsequent release they have continued making the integration even better. This will facilitate the developers to have the best of both the worlds. BTW, Spring AOP implementation is far more capable than it may sound here (only because it's being compared with the best of breed and de-facto AOP implementation named AspectJ) and the Spring Framework uses Spring AOP for transaction management, security handling, remote access, and JMX.


Liked the article? You may like to Subscribe to this blog for regular updates. You may also like to follow the blog to manage the bookmark easily and to tell the world that you enjoy GeekExplains. You can find the 'Followers' widget in the rightmost sidebar.


Share/Save/Bookmark


Thursday, November 20, 2008

Using XSD to create XML Doc and applying an XSL on it


Using XSD to create XML Doc and applying an XSL on it

I was given an XSD (XML Schema) and was asked to do a couple of things:- (i) Generate an XML document out of the XSD and (ii) Generate (and test of course) an XSL to check if one of the XML elements (named 'filename') contained a specific string (say "abc") at a specific position or not. These tasks are of course not very complex in nature, but while doing them I got a feeling that I had unintentionally revisited most of the common stuff about Schemas, XML Docs, XSLs, and their application simply in one go and that too so quickly. Hence I thought of putting it all in an article so that interested people may go through it for revising some common oractical stuff about XML/XSL especially when they are not interested in getting into too much of theoretical details.


Given XSD (XML Schema)


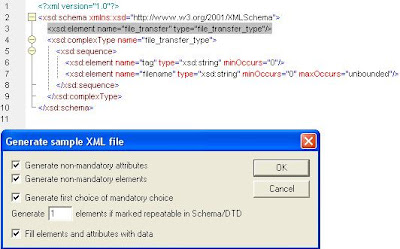
Generating XML Document from XML Schema using XMLSpy


<?xml version="1.0" ?>
<xsd:schema xmlns:xsd="http://www.w3.org/2001/XMLSchema">
<xsd:element name="file_transfer" type="file_transfer_type" />
<xsd:complexType name="file_transfer_type">
<xsd:sequence>
<xsd:element name="tag" type="xsd:string" minOccurs="0" maxOccurs="1" />
<xsd:element name="filename" type="xsd:string" minOccurs="0" maxOccurs="unbounded" />
</xsd:sequence>
</xsd:complexType>
</xsd:schema>


How to generate an XML out of it? Well... you can manually generate an XML in a few minutes as the Schema is not so complex, but why to waste time when we have tools to do it. You have quite a few options - Altova XMLSpy being one of them. I used this tool. Generated XML was:-


<?xml version="1.0" encoding="UTF-8"?>
<!--Sample XML file generated by XMLSPY v2004 rel. 4 U (http://www.xmlspy.com)-->
<file_transfer xmlns:xsi="http://www.w3.org/2001/XMLSchema-instance" xsi:noNamespaceSchemaLocation="C:\schema_file.xsd">
<tag>String</tag>
<filename>String</filename>
</file_transfer>


Generating the XSL which tests whether 'filename' has "abc" or not


<xsl:stylesheet xmlns:xsl="http://www.w3.org/1999/XSL/Transform" version="1.0">
<xsl:output omit-xml-declaration="yes"/>
<xsl:template match="/">
<xsl:param name="filename" select="file_transfer/filename"/>
<xsl:param name="substrfilename" select="substring($filename, 7, 3)" />
<xsl:if test="$substrfilename='abc' ">
<xsl:comment>Ignore</xsl:comment>
</xsl:if>
</xsl:template>
</xsl:stylesheet>


Applying XSL on XML Doc to test the result


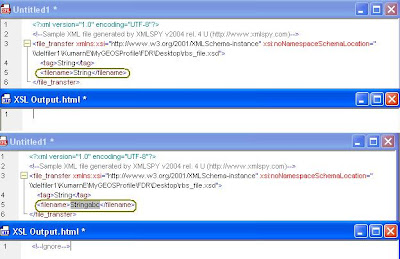
Again you have plenty of options - you may use Java XSLT Processing APIs or some XML/XSL Processing tool like XMLSpy. I used the latter one for the obvious reasons. Find below the screnshots of outputs for negative (when the 'filename' doesn't contains the sub-string 'abc' at the specified location) and positive (when the 'filename' contains the sub-string 'abc' at the specified location).


As you can see that the XMLSpy output above clearly shows that when the value of the XML element named 'filename' has the sub-string 'abc' at index 7 (counted from 1) then the output window shows XML Comment having text 'Ignore' as specified in the XSL. When the value of element 'filename' doesn't contain 'abc' then the output windows shows nothing as the test condition specified in the XSL doesn't return 'true' and hence the control simply skips to the subsequent statement. I believe the XSL code is quite self-explanatory and easy to understand. However, that shouldn't stop you to discuss anything you feel like. You may bring up something really interesting on the table which I might have missed to notice.


Liked the article? You may like to Subscribe to this blog for regular updates. You may also like to follow the blog to manage the bookmark easily and to tell the world that you enjoy GeekExplains. You can find the 'Followers' widget in the rightmost sidebar.


Share/Save/Bookmark


Sunday, November 16, 2008

Ease of Dev in Java 5: Generics, Autoboxing, Static Import, Enhanced for, Annotation, & Typesafe enum


Java 5 features for easier dev: Generics, Autoboxing/Unboxing, Static Import, Enhanced for, Typesafe enums, Annotaion/Metadata

I had to give a presentation on Java 5.0 few weeks back in my company and during that time I went through an interesting
interview (taken sometime in 2003) of Joshua Bloch who touch based on the six popular new features of Java 2 Platform, Standard Edition 5.0 (also knwon as J2SE 5.0) including Generics, Autoboxing, Static Imports, Annotations, Enhanced for loop, and Typesafe Enums. He talked about how these new features are going to be accepted by the developers worldwide and how actually will these features make application development in Java easier, safer, and more robust. Bloch is an architect at Sun Microsystems and he has been involved in the design and implementation of several Core Java features including the highly regarded Collections Framework and the java.math package. He has authored the Jolt award winning book named "Effective Java". His interview can be found here.

Before we move ahead let's discuss what the six major new features (aimed towards ease of development) introduced in Java 5.0 are all about.

  • Generics: this feature is used to ensure compile-time safety for Collections and eliminates the need for having the casts. The feature guarantees the code using Collections won't throw the infamous runtime exception named 'ClassCastException' as such cases can be detected at compile-time itself if the programmer uses Generics. A big relief, isn't it?
  • Autoboxing/Unboxing: this feature is used to make the automatic casting possible between the primitive data types and their corresponding wrapper data types. For example: an 'int' can now be assigned to a reference of type 'Interger' and vice-versa. The compiler automatically takes care of this.
  • Static Import: remember using Interfaces just for using static constants in Java programs. Interfaces are not meant for that, instead they should be used for defining types. Using them just for the sake of using constants not only defeats the actual meaning of interfaces, but it also makes the code less flexible as implementing an interface is a public contract and even if you plan not to use the constants defined in the interface in the newer implementations of the class then also you got to maintain the contract as the clients might have used the interface as a data type for the implementing class in their code. Static import actually imports all the static members of a class/interface making them available to be used with their simple names and thus you can avoid implementing the interfaces for using the constants.
  • Enhanced for-loop: this feature makes the for-loop more compact. The iterators now don't need to be explicitly checked for boundary conditions.
  • Annotations/Metadata: this feature helps the programmer by letting the tools generate the obvious code just by supplying the corresponding annotation tags. It makes the programming more "declarative" in nature.
  • Typesafe enums: most of the shortcomings of the enums which previously require lot of coding around their use to ensure safe usage have now been resolved in this new version of enums which are completely Typesafe and additionally they can be used with switch statement as well.

Some of the interesting questions taken from his interview are listed below:-


Question: How Java 5.0 will help making Java an easier and more effective language to work with?


Answer: Bloch summarizes the answer to this question with two main points saying that Java 5.0 will help shifting the
responsibility of writing the boilerplate code from the programmer to the compiler and he believes that the whole will be greater than the sum of its parts. Generics, Autoboxing, Enhanced for-loop are the features which shift quite a lot coding responsibility from the programmer to the compiler. Humans are error prone and hence shifting the responsibility ultimately not only speeds up the development, but also makes the code more reliable and secure.

Since all the features have been thought about keeping the others (and those which are already existing) in mind and hence
the designers have exploited the positives of all possible features during the design and implementation of these features. This makes the overall benefit even more than what these features could have contributed while having been designed in isolation. For example: Generics, Autoboxing, and Enhanced for-loop make such a fabulous combination when used together and this results into one of possible scenarios where we actually realize the power of these features, especially when they are used together. One example taken from his interview which nicely shows how well can the these features be combined to get cleaner, safer, and easier to write code is as follows:

The example counts the frequency of words supplied at the command line. There are two versions, the former without the use of
any Java 5.0 features and the latter beautifully uses Generics, Autoboxing, and Enhanced for-loop.


public class Freq {
private static final Integer ONE = new Integer(1);

public static void main(String args[]) {
// Maps word (String) to frequency (Integer)
Map m = new TreeMap();

for (int i=0; i<args.length; i++) {
Integer freq = (Integer) m.get(args[i]);
m.put(args[i], (freq==null ? ONE :
new Integer(freq.intValue() + 1)));
}
System.out.println(m);
}
}


As you can easily figure out that the above code counts the frequency by having a TreeMap where the keys are the words and
the corresponding values are their frequencies. At the first occurrence of the word the value is set to ONE and subsequently it increases by 1 on every other occurrence of the same word. Now see the same program using the three new features of Java 5.0:


public class Freq {
public static void main(String args[]) {
Map m = new TreeMap();
for (String word : args) {
Integer freq = m.get(word);
m.put(word, (freq == null ? 1 : freq + 1));
}
System.out.println(m);
}
}


Clearly it's far more readable and easier to understand, write, and maintain than the former version.


Question: Will the changes be hard for developers to adapt to?

Answer: Bloch says that it won't be tough for the developers to adjust to the changes. Generics will probably be little tricky in the beginning as the declaration will now require more info to be supplied.

Considering the benefits of Generics these adjustments don't really bother the programmers. In fact, once used to the feature
they start realizing that how the readability and cleanliness of the code has tremendously improved. No explicit casting required and no fear of the runtime ClassCastException now :-)

Question:
How does the "enhanced for-loop" help the developers?


Answer:
This feature allows the programmers to forget about taking care of the iterators obtained from the Collections. The
compiler automatically does that and it ensures that the iterators for each element in the Collection they have been obtained from. Bloch says that having two extra keywords "foreach" and "in" could have made this even more readable and understandable, but that might have compromised with the compatbility with the earlier versions as the clients might have used these two words as identifiers in their programs.

Liked the article? You may like to Subscribe to this blog for regular updates. You may also like to follow the blog to manage the bookmark easily and to tell the world that you enjoy GeekExplains. You can find the 'Followers' widget in the rightmost sidebar.


Share/Save/Bookmark


Wednesday, November 12, 2008

Playing with try-catch-finally in Java. Intersting scenarios.


Various possible scenarios for try-catch-finally blocks and their execution

Do you feel that you understand how try-catch and finally blocks are executed in Java? If no then you would first like to read the article - finally explained >>


So now I can safely assume that you have a fair understanding of how the exception handling mechanism actually works in Java. Okay, let's try that out with few interesting programming scenarios. You'll find few code-snippets below and you may like to figure out the corresponding outputs to see how many of them you actually hit correct :-) Hope you get all of them right!


Scenario #1: try throwing an exception; catch and finally both having return statements


public class TestFinally {

/**
* @param args
*/
public static void main(String[] args) {

System.out.println("Inside main method!");
int iReturned = new TestFinally().testMethod();
System.out.println("Returned value of i = " + iReturned);

}

public int testMethod(){

int i = 0;
try{
System.out.println("Inside try block of testMethod!");
i = 100/0;
return i;
}catch(Exception e){
System.out.println("Inside catch block of testMethod!");
i = 200;
return i;
}
finally{
System.out.println("Inside finally block of testMethod!");
i = 300;
return i;
}
}
}


Output: a return (or any control transfer for that matter) in finally always rules!


Inside main method!
Inside try block of testMethod!
Inside catch block of testMethod!
Inside finally block of testMethod!
Returned value of i = 300


Scenarios #2: try having exception-free code and a return; catch and finally both have return


...
try{
System.out.println("Inside try block of testMethod!");
i = 100;
return i;
}catch(Exception e){
System.out.println("Inside catch block of testMethod!");
i = 200;
return i;
}
finally{
System.out.println("Inside finally block of testMethod!");
i = 300;
return i;
}
...


Output: did you get the first one right? This is a cakewalk then. With the same logic that any control transfer in finally always rules we can easily predict the output to be similar to that of Scenario #1 with the only difference that in this case the catch block won't be executed as no exception thrown... all right? Here is the output:


Inside main method!
Inside try block of testMethod!
Inside finally block of testMethod!
Returned value of i = 300


Scenario #3: try having exception; finally doesn't have a return


...
try{
System.out.println("Inside try block of testMethod!");
i = 100/0;
return i;
}catch(Exception e){
System.out.println("Inside catch block of testMethod!");
i = 200;
return i;
}
finally{
System.out.println("Inside finally block of testMethod!");
i = 300;
//return i;
}
...


Output: no return in finally means whatever executable return encountered on the way to finally will be executed once finally completes its execution, so the output would be:


Inside main method!
Inside try block of testMethod!
Inside catch block of testMethod!
Inside finally block of testMethod!
Returned value of i = 200


Scenario #4: try and catch both having exception; finally having a return


...
try{
System.out.println("Inside try block of testMethod!");
i = 100/0;
return i;
}catch(Exception e){
System.out.println("Inside catch block of testMethod!");
i = 200/0;
return i;
}
finally{
System.out.println("Inside finally block of testMethod!");
i = 300;
return i;
}
...


Output: control transfer in finally overrules the exceptions thrown in try/catch, hence the output would be:


Inside main method!
Inside try block of testMethod!
Inside catch block of testMethod!
Inside finally block of testMethod!
Returned value of i = 300


Scenario #5: try and catch both having exception; finally NOT having any return


...
try{
System.out.println("Inside try block of testMethod!");
i = 100/0;
return i;
}catch(Exception e){
System.out.println("Inside catch block of testMethod!");
i = 200/0;
return i;
}
finally{
System.out.println("Inside finally block of testMethod!");
i = 300;
//return i;
}
...


Output: since no return in finally, hence after the execution of the finally block the sheer need to have an executable return statement (which doesn't exist in this case as catch also has an exception) would throw the exception encountered right before the finally execution started, which would be the exception in catch block in our case...right? So, the output would be:


Exception in thread "main" java.lang.ArithmeticException: / by zero
at TestFinally.testMethod(TestFinally.java:24)
at TestFinally.main(TestFinally.java:10)
Inside main method!
Inside try block of testMethod!
Inside catch block of testMethod!
Inside finally block of testMethod!


Scenario #6: try, catch, and finally all three having exceptions


...
try{
System.out.println("Inside try block of testMethod!");
i = 100/0;
return i;
}catch(Exception e){
System.out.println("Inside catch block of testMethod!");
i = 200/0;
return i;
}
finally{
System.out.println("Inside finally block of testMethod!");
i = 300;
return i/0;
}
...


Output: evidently the exception would be thrown, but which one? The one which was encountered last i.e., the one encountered in the finally block. Output would be:


Inside main method!
Inside try block of testMethod!
Inside catch block of testMethod!
Inside finally block of testMethod!
Exception in thread "main" java.lang.ArithmeticException: / by zero
at TestFinally.testMethod(TestFinally.java:30)
at TestFinally.main(TestFinally.java:10)


Scenario #7: try and catch both fine; finally doesn't have any return


...
try{
System.out.println("Inside try block of testMethod!");
i = 100;
return i;
}catch(Exception e){
System.out.println("Inside catch block of testMethod!");
i = 200;
return i;
}
finally{
System.out.println("Inside finally block of testMethod!");
i = 300;
//return i;
}
...


Output: well... first thing first. If try is fine, do we need to even think about catch? A BIG No... right? Okay, so we have try and finally blocks to focus on. Let me first show you the output and then we would discuss if you have any doubts. Here is it:


Inside main method!
Inside try block of testMethod!
Inside finally block of testMethod!
Returned value of i = 100


In response to the article on 'finally explained', an anonymous visitor left a comment asking why the value of i set in the try block is returned in this case even though we know that finally completes first. Well... a nice pick I must say? Did you also notice the same?


Let's try to understand how all these statements would be executed. try-block would of course be started first and executed till any exception or a control transfer statement is encountered. If it's an exception, the control would go to catch and subsequently to finally to complete the execution. If it's a control transfer (like a return, break, continue, etc.) then the control transfer statement is evaluated (if any variable or expression involved as is the case here. 'return' is having a variable 'i' and hence the current value '100' in this case would be evaluated the statement would look something like 'return 100') and kept in a pending state. Once the finally is executed then the runtime sees if finally-block has any valid control transfer statement or not and if found then the pending control transfer statement is forgotten and the one present in finally is actually executed. In case finally-block doesn't have any control transfer statement then the pending one is executed and mind you it's not re-evaluated. This is not unusual as well. Try to understand it this way: in a normal case if we have a statement like 'return i*i' what would happen first? Since this is a complex statement involving a expression hence the expression would first be evaluated and once evaluation is complete then the value would replace the placeholder originally occupied by the expression. For example: if i = 10, then 'return i*i' would become 'return 100' and now this statement doesn't have any reference to 'i' to have any other value change in future...right? The pending control transfer statement would always be in a ready-to-run shape and it would not have any reference to any variable and hence any change to 'i' in the finally block would not affect the value associated with the pending 'return' statement. Makes sense?


Update [08-Jan-2009]: find another interesting try-catch-finally scenario involving possible combinations of inner and outer finally and catch blocks with nested try blocks - another interesting try-catch-finally scenario >>

Liked the article? You may like to Subscribe to this blog for regular updates. You may also like to follow the blog to manage the bookmark easily and to tell the world that you enjoy GeekExplains. You can find the 'Followers' widget in the rightmost sidebar.


Share/Save/Bookmark


Tuesday, November 11, 2008

Image Processing in Java. Dim, Regions, Thumbnails, etc.


Using Java APIs for getting dim, selecting region, thumbnails, etc..

The Java 2D API treats all the images as a rectangular 2D array of pixels, where a pixel is nothing but the representation of the color at that position in the image and evidently dimension is the horizontal (width) and vertical (height) extent of the image.


The API uses representation of images as objects of the class java.awt.image.BufferedImage class and once you have created an object of this class for an image, you can play with any of the available APIs (which support quite a few image processing capabilities) to have a programmatic image processing experience. These objects can either be created directly or by providing an external image of any of the supported image types (almost all popular types are supported including GIF, PNG, JPEG, BMP, and WBMP). The Image I/O API is bundled in the javax.imageio package. Image I/O is extensible as well, which means plug-ins for non-supported file formats can be used easily. TIFF and JPEG 2000 plug-ins are separately available and are the widely used plug-ins with Image I/O.


The APIs not only allow you to draw different objects (lines, texts, or even images) over the image objects, gather info about the images like width, height, etc., but also allow you to blur or sharpen the images. That means you will virtually have almost everything you need to develop a image processing tool like Picasa :-)


java.awt.image.BufferedImage which is a sub-class of java.awt.Image class manages the image in memory and this class has methods for retrieving or manipulating pixel data of the image.


Reading/Writing an image


...
BufferedImage image = null;
File imageFile = new File("C:\images\geek.jpeg") //image file path

try{

image = ImageIO.read(imageFile);

}catch(IOExcetion ioe){

System.err.println("ERROR: image '" + imageFile.getName() + "' " + "couldn't be read!");
System.exit(1);
}
...


The read method has several formats, each of which support reading an image in a different way. For example: we can read image directly by specifying the image file path or if we are reading an image in an applet then we can simply provide the URL of the image obtained from the Applet Codebase.

Similarly we can use the write method to write a supported image file. A sample code snippet can be like this:


...
BufferedImage image = null;
File imageFile = new File("C:\images\geek.jpeg") //image file path

try{

ImageIO.write(image, "jpeg", imageFile);

}catch(IOExcetion ioe){

System.err.println("ERROR: image '" + imageFile.getName() + "' " + "couldn't be written!");
System.exit(1);
}
...


How do the APIs identify a supported image file format?


The file formats are identified automatically by reading the "magic number" of the image file which almost every image contains in their first few bytes. If no such magic number is found or if the number is nor recognizable then the API fails and we may require some sort of extra code to make the APIs work for such image files or we may require to install separately available plug-ins to support them.


How to get the currently supported formats for reading/writing?


This can be obtained pro grammatically by calling the APIs ImageIO.getReaderFormatNames() and ImageIO.getWriterFormatNames(), respectively. You may like to extract the image file extension and check if it's one of the supported formats or not and this may allow your application to handle any image file format (supported or unsupported) gracefully.


Using ImageReader.read instead of ImageIO.read


Instead of using ImageIO.read() method to decode the entire image , an application may use the ImageReader (obtained from the ImageIO class) to have a better control on image decoding and reading.

These readers can be obtained either by specifying the image file type or file suffix, MIME type, or it may even be based on the file contents. As we know that a "gif" file is actually a series of files which are repainted at a certain time interval to give the feel of animation. In such cases, an ImageReader can be used to read all the images contained in a single "gif" image. We use ImageIndex for that. The index starts from "0" and obviously we would require to provide only "0" for those image file types which contain only one image. Find below a sample code snippet:


...
Iterator imageReaders = ImageIO.getImageReaders("gif");
ImageReader imageReader = (ImageReader)imageReaders.next();
...

Object imageSource; // it can be either File or InputStream
ImageInputStream iis = ImageIO.createImageInputStream(imageSource);

//...attaching the image source to the reader
imageReader.setInput(iis, true);
...

//...reading first image
BufferedImage image1 = reader.read(0);


Obtaining info like height, width from an image


Height or Widhth can be obtained once you've obtained a ImageReader and attached it to the image source you're interested to find the info about. ImageReader not only allows you to have these info, but also goes a step further and allows you to sample the image by specifying the region of the image you're interested into. This avoids reading the entire image, say for example if you're interested only in the top left quadrant. Obviously a performance boost.


Image Width and Height can be obtained by calling the obvious-looking APIs named getImageWidth(imageIndex) and getImageHeight(imageIndex). The APIs return an 'int' value which can be manipulated to specify a selected region of the image using the corresponding co-ordinates. We just need to pass an object of type ImageReadParam in this case which encapsulates all the parameters. Find below a sample code snippet for better understanding:


...
int imageIndex = 0;

//...obtaining height and width
int width = imageReader.getImageWidth(imageIndex);
int height = imageReader.getImageHeight(imageIndex);

//... creating a region for the upper-left quadrant
Rectangle rectangle = new Rectangle(0, 0, width/2, height/2);

//... getting the default ImageReadParam and setting the parameters
ImageReadParam imageReadParam = imageReader.getDefaultReadParam();
imageReadParam.setSourceRegion(rectangle);

//... now we can read the upper-left quadrant by passing the ImageReadParam object
BufferredImage upperLeftQuad = imageReader.read(imageIndex, imageReadParam);
...


Similarly we can call any of the available APIs to set the corresponding parameters in the ImageReadParam object and once done with that then we simply need to pass that to the read method of the ImageReader class and we're done!


Reading/Accessing Thumbnail images


Thumbnails are a small preview (or maybe multiple depending on the particular image format) associated with the main image. Accessing thumbnails is evidently much faster as they are of smaller size and hence they can be decoded faster. ImageReader provides API to find out the number of thumbnails available with a particular image. In case the image has multiple images (as is the case with GIF images) then each of these images can have their own thumbnails. Find below a sample code snippet illustrating how easily can you use these APIs:


...
int numOfThumbnails = 0;
numOfThumbnails = imageReader.getNumThumbnails(imageIndex);

for(int i = 0; i < thumbnailimage =" imageReader.readThumbnail(imageIndex,">


This sort of completes our discussion of the ImageReader class and its possible uses. ImageWriter can also be used in a very similar way and I hope it would not be a tough task using the APIs belonging to that class assuming that you now have a fair understanding of the image processing in Java. Do let me know in case any of the APIs of the ImageWrite class need any further discussion. I've removed try-catch from some of the code-snippets just to avoid cluttering and to maintain teh focus on the actual APIs. These code-snippets are just to give you a feel as how easily you can use the APIs. Use them as per your application requirements. See the Sun Java documentation of the classes for the entire list of APIs available. Some of them are: ImageIO, ImageReader, ImageWriter, ImageReadParam.


Share/Save/Bookmark


Saturday, November 8, 2008

MVC Pattern & its importance. Push & Pull Mechanism


MVC Pattern & its importance. Push & Pull Mechanism

MVC (Model View Controller) architecture/pattern


It's an architecture (which is sometimes referred to as a design pattern as well) pattern which clearly separates the Business Logic, Presentation of the Response, and the Request Handling & Processing. JSP Model 2 Architecture is based on the MVC pattern.


Does it sound complex? Well... it's not. In fact this pattern aims to make application design, development, and maintenance simpler. The scalability and extensibility of the applications become easier and less time consuming.


MVC & Web Applications


MVC pattern is normally talked about in the context of Web Applications only, but the fact is that it's used for other applications as well. For example: SmallTalk applications which are not Web Apps use this pattern for the simple reason that the use separates the roles and responsibilities (not only among developers, but also among the various application components... can the two happen separately?) very nicely which ultimately results into a robust, simpler, and better maintainable/scalable software life cycle.


Java/J2EE (or .Net) based Web Application development is heavily based on the MVC pattern and it seems the two are inseparable now. Not only design and development, but also the post-production phases like maintenance, scalability, and extensibility are handled so well by this pattern that it has become kind of de-facto architecture for Web Apps.


MVC Components

  • Model: this component is responsible for maintaining the state of the business domain of the application. It can be as simple as a plain Java object populated manually using a ResultSet by obtaining it from a DB connected via JDBC APIs or it can be populated automatically by using one of several ORM tools like TopLink, Hibernate, etc.
  • View: this component is responsible for presenting the business domain using data from the Model. This component is typically a HTML page for static content display or a JSP page for dynamic content display. WML is used as View component for display on wireless and hand held devices. Since the Model and View components are separate, hence we can have two or more Views for the same Model - maybe one for display on PCs and another for wireless & hand held devices.
  • Controller: this component is responsible for all the Request Processing by controlling the flow of control and by instantiating, invoking, and maintaining the business operations. It's normally a Java Servlet. For request handling it needs to intercept he HTTP request, translate the request into some business function, get the function (or the handler of the function) invoked, and finally by sending back the response page to the client. Evidently it separates the presentation of the data with the business function implementation which makes which promotes re-usability of the business function implementations. Since all the requests are processed through Controller only, hence we can put the common code (which we would other wise need to put in every JSP page) in it. This will obviously improve the maintainability as the common code would be required to be looked at only one place and not at multiple places.

Push & Pull Notification Mechanisms

Web applications are stateless as they use the stateless protocol HTTP. So, once a request is served to the client then there is no direct way of notifying him/her about the changes made to the Model. To handle this scenario there are two mechanisms -


Push Mechanism:
forcibly sending the response back to the client whenever any change to the Model happens, but this is not very easy to implement as the server would require to maintain client info. There are other challenges as well. HTTP requests are processed by first establishing the connection to the server, sending the requests, receiving the response, and finally terminating the connection. Once the request has been served the connection is lost. How would the server then send back the updated response? Since the HTTP protocol is stateless the client may simply close the browser window without even notifying the server that it no longer needs any updated info.


Pull Mechanism:
this mechanism is normally used to handle the above mentioned scenario. This requires the client to pull the updated data rather than the server pushing the updated data to the client. How can this be done? Well... either by having a simple button (clicking which will make another fresh request to the server and the client would get the updated data in response) or by having a script which would automatically be making the HTTP requests - maybe periodically after a certain time-interval. This is how Live Cricket Scores are displayed. Right?


Liked the article? You may like to Subscribe to this blog for regular updates. You may also like to follow the blog to manage the bookmark easily and to tell the world that you enjoy GeekExplains. You can find the 'Followers' widget in the rightmost sidebar.


Share/Save/Bookmark


Sunday, November 2, 2008

Creating Windows NT Services for a Java application


Creating Windows NT Services out of a Java application

There are many ways of creating Windows Services out of Java Applications, one very popular of them is by using the Java Service Wrapper (a set of batch files) developed by Tanuki Software. Below are the steps which one need to follow to install, launch, stop, or uninstall Windows NT services for a Java app:-
Download the utility

wrapper.exe is the actual executable of the utility named Java Service Wrapper which you need to download from the Tanuki Software web site. The distribution comes in three flavors - Professional, Standard, and Community. The first two are required to be purchased whereas the third is freely downloadable. You can download the distribution for your platform here.

Download and set up the Scripts

The Java Serive Wrapper distribution (freely downloadable) contains three batch files as well. These files are initially named: App.bat.in, InstallApp-NT.bat.in, UninstallApp-NT.bat.in which you need to rename to make them suitable for your application. The Batch files doesn't need any other change except for the rename until you comply with where to put these files and where to keep the configuration directory and its contents. We'll see how easily can these tasks be done.

Suppose your application mame is 'MyApp' then you would be required to rename the three batch files as MyApp.bat, InstallMyApp-NT.bat, and UninstallMyApp-NT.bat respectively. Notice that there is no '.in' extension now. Please do make sure that you rename the batch files correctly.

In the default case you need to place these batch files in the same directory where you have kept the wrapper.exe file in the previous step.

Setting up the Configuration File

There is one configuration file named wrapper.config for this utility which you need to put in a directory named 'config' located one level up than the location which contains the wrapper.exe file and the three batch files.

Can we place the files at different locations?

Yeah... you surely can. But, in that case you will need to modify the batch files and the configuration file accordingly. The modifications are quite easy to make as you'll simply be required to update the default values of the variables storing the various pathnames.

Running the application in Console Window

Once the set up is done then you would first like to check if your application is actually ready to be installed as a service or not. This you can ensure by running the application in a console window first. Just double-click the MyApp.bat file and the application will start in a console window. Like any other console execution this can also be terminated by Ctrl+C whenever required. Wondering how did the batch file get the application name? From the name of the batch file itself - that's why you were required to change the names of batch files in the beginning.

C:\MyApp\bin>MyApp.bat
wrapper | --> Wrapper Started as Console
wrapper | Launching a JVM...
jvm 1 | Wrapper (Version 3.x.x)
jvm 1 |

Installing the Service

So now that your application has already been tested in a console window, you would like it to be installed as a Windows NT service. You are just a click awaya and if everything is okay the application will be installed as a Windows NT service almost instantly. If something goes wrong you'll be notified the actual errors. Just fix them and try again in that case. The service will also have the same name 'MyApp'.

C:\MyApp\bin>InstallMyApp-NT.bat
wrapper | My Application installed.

Starting the installed Windows NT Service

You can either start them by going through Control Panel -> Administrative Tools -> Services -> Start the service OR by executing the command 'net start MyApp' OR by using the utility 'wrapper.exe'. You can setthe property wrapper.ntservice.starttype to AUTO_START and in that case the service will be started whenever the machine is rebooted.

To start the service by using the 'wrapper.exe' utility you need to execute the command 'wrapper.exe -t ..\conf\wrapper.conf'.

C:\MyApp\bin>wrapper.exe -t ..\conf\wrapper.conf

Stopping an already started Windows Service

Again you can either do that either through the Control Panel -> Admin Tools -> Services -> Stop OR by executing the command 'net stop MyApp' OR by executing the utility 'wrapper.exe' with the proper switch '-p' in this case.

C:\MyApp\bin>wrapper.exe -p ..\conf\wrapper.conf

Why to prefer 'wrapper.exe' with corresponding switches for Start/Stop?

Because 'net start MyApp' and 'net stop MyApp' may work well only for those services which don't take much time to get started or stopped. If a service is taking much time while stopping, the execution of 'net stop ServiceName' may show 'Service stopped successfully' even before the service actually stops. This might be a problem if the execution of the application is dependent on the start/stop status of the service. You may face a similar issue with 'net start ServiceName' as well. Do make a note that Control Panel -> Admin Tools -> Services doesn't have these kind of problems and hence you may rely on them.

Using 'wrapper.exe' with appropriate switches ('-t' for Start and '-p' for Stop) guarantees that you don't face any such issue. Another advantage is that you don't need to specify the ServiceName in this case. It picks the name of the service from the configuration file.

Uninstalling an installed Service

Want to get rid of the service? You can do that with the same ease. You just need to run the UninstallMyApp-NT.bat file. You would see something similar to this:

C:\MyApp\bin>UninstallMyApp-NT.bat
wrapper | Service is running. Stopping it...
wrapper | Waiting to stop...
wrapper | My Application stopped.
wrapper | My Application removed.

Installing/Uninstalling the service using 'wraper.exe' with switches

You can install and uninstall Windows NT services by executing the wrapper.exe file with appropriate switches as well. '-i' is the switch for installing a Windows NT service and '-r' is the switch for removing (uninstalling) it. You can find the list of all available switches and their usage by executing 'wrapper.exe' without passing any argument. It'll show the Usage pattern of the utility, all the switches and their respective meanings.

Checking the Status of the Service

'wrapper.exe' when executed with the '-q' switch will show the current status of the Service showing if the installed or not and if installed then its Start Type (whether Automatic or not), whether the service is Interactive or not, and whether the service is Running currently or not.

Liked the article? You may like to Subscribe to this blog for regular updates. You may also like to follow the blog to manage the bookmark easily and to tell the world that you enjoy GeekExplains. You can find the 'Followers' widget in the rightmost sidebar.


Share/Save/Bookmark